PowerShell - Finally Testing PernixData!
My home lab has been in need of some upgrades lately. One of the easiest, and cheapest, was the addition of PernixData and their FVP Freedom edition release. Couple of caveats I feel I should cover if you’ve never been exposed to PernixData’s FVP product:
- FVP, the normal offering, cannot activate a Freedom license.
- FVP Freedom edition cannot be installed and used in trial mode.
- FVP Freedom edition can only use RAM as an acceleration resource and requires a minimum of 4GB free per host.
- FVP Freedom edition can only be used for read only acceleration (ie. write through mode).
- FVP Freedom edition cannot be used with more than one cluster.
With that said, I ended up going with the regular FVP edition in trial mode because I don’t have an additional 4GB of RAM available. The install was extremely easy using SQL Express. vSphere Web client plugin installed to my VCSA instance properly and creating the first FVP Cluster was equally as easy. However this isn’t about the install and config, so let’s jump to the Powershell module!
First, if you’re on the management server, import the module:
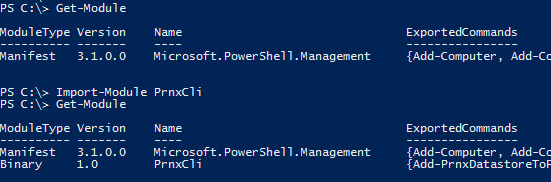
If you don’t happen to be on the management server, you’ll want to copy/paste the “Program Files\PernixData\FVP Management Server\Client\PSModule” directory over to the desired system and then point the import cmdlet at the “PrnxCli.dll” file. Pointing the import cmdlet at the “PrnxCli.psd1” file produces an error stating it can’t find the nested modules:

Second, connect to the PernixData Management server: ($creds variable is the result of the Get-Credential function used to store credentials)

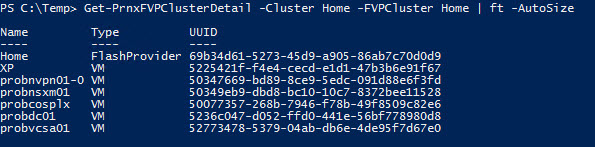
Since I already setup an FVP cluster, lets explore an existing FVP cluster by the name of “Home”. The “Get-PrnxFVPClusterDetail” cmdlet shows all of the objects within the Home FVP cluster:
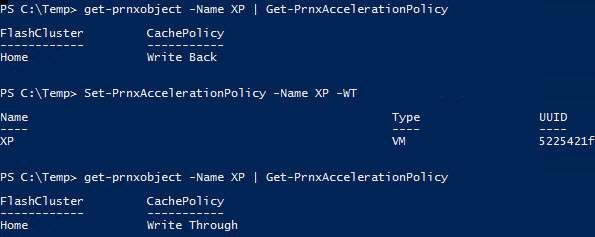
Displaying the current acceleration policy for a specific object via “Get-PrnxAccelerationPolicy” for the “probcosplx” VM: 
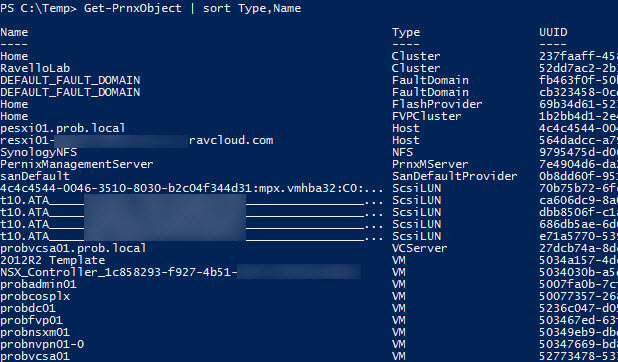
Some other cmdlets that can be used to explore the environment include: “Get-PrnxNFS”, “Get-PrnxScsiLUN”, “Get-PrnxVM”, and “Get-PrnxVMFS”. However if you’re in a smaller environment, you can get a sum of all of those cmdlets by running the “Get-PrnxObject” cmdlet. It’s also worth noting that all of the cmdlet responses have quite a bit more information under the covers such as auth level, support status, stats, policies, etc. Run the cmdlet with a " | select *" to see the rest of the information being returned.
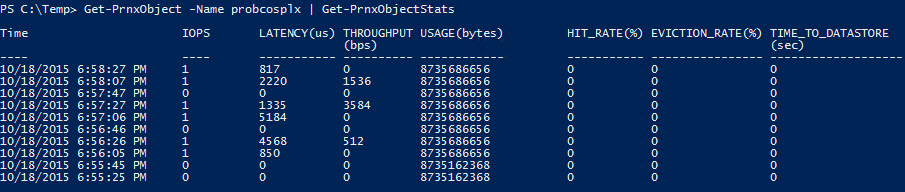
The last thing that we haven’t looked at in the exploratory phase would be statistics! Those are pulled by way of the “Get-PrnxObjectStats” cmdlet:
Now that we have the exploration piece done, let’s modify an object to change their Acceleration Policy. This is accomplished by way of the “Set-PrnxAccelerationPolicy” cmdlet:
Overall, it’s a pretty comprehensive module where anything you can do in the GUI can be done via Powershell. However there are some things, as minor as they are, that I wouldn’t mind seeing added to the module in a future release:
- Get-PrnxAccelerationPolicy - Show the name of the object information is received about, auto-population of the “Type” parameter, and a better way to decipher if an object is accelerated or not (currently an un-accelerated object shows up with an empty FlashCluster but still shows a policy of “Write Through”)
- Adding some functionality around piping output into new cmdlets.
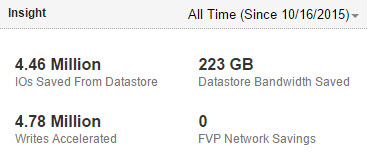
Lastly, I figure I should show off some of the stats as they really are quite impressive. Here’s what FVP did for me in just 3 days in my home lab: