
Automating Blog Updates With GitHub Actions
A while back, I transitioned my blog from Wordpress to Hugo. The transition was relatively painless, mainly due to the number of tools available to manage that process. However, this blog isn’t about the transition. We’re going to be talking about some of the nuances in using Hugo as your blog platform of choice and how to make those easier.
The first thing to make clear, Hugo isn’t a hosting platform. Hugo takes a set of markdown files and, through some magic of the programming language Go, generates a website. At that point, it’s up to the individual to host the site somewhere. Since the result is a set of html, css, xml, and so forth formatted files, the site can be hosted anywhere. The Hugo site does have an overview of the Hosting and Deployment options, including write-ups on how to streamline the process.
GitHub and GitHub Pages were chosen as my locations of choice. I already store a majority of my source controlled code on GitHub, so storing my blog’s config was easy. I always had heard good things about GitHub Pages, so I checked them out. The decision was pretty easy after finding out that the service was free, SSL was free, and the Hosting on GitHub directions were very straight forward.
Let’s get to the automation piece of the blog.
Hugo has a very nice script that is availble on the above “Hosting on GitHub” page. It takes your config files from a local git repo, runs them through the Hugo generation process, outputs them to a separate git repo (which is the source for your GitHub Pages site), and wraps up with a push up to GitHub. The process is pretty simple, but we can wrap some CI/CD processes around it and make it even easier!
Integrating GitHub Actions
GitHub Actions is a workflow engine that allows us to run actions against any public API based on triggers within GitHub. The GitHub Actions workflows are defined in a YAML-formatted file. This file establishes the configuration of things, such as what events should include action processes, the type of runner to use, and the configuration of the jobs with the required steps to reach completion.
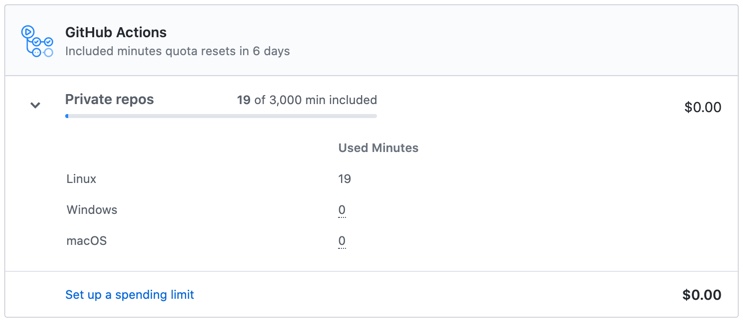
One big disclaimer, there is a cost involved for GitHub Actions. This is because, under the covers, there is a virtual instance being deployed and used. In this case, that instance is being used to run the script to build the site and transfer it to our GitHub Pages repo. However, you should probably find that your GitHub account already has an allocation of free minutes included. You can verify this in your account’s Billing section. For example, my account includes 3,000 minutes, which is more than plenty!
Set Up
GitHub Actions is going to be integrated into the directory where our Hugo configuration is and not the repo where GitHub Pages located. Preparing a repo for usage with GitHub Actions is pretty straight forward. We’re going to add a couple folders to our repo’s directory, a YAML file, create a new personal access toke, and save it as a secret.
In order for the GitHub Actions process to pick up the YAML file, there’s a specific location for it to live. Each repository using actions requires a directory structure of /.github/workflows. Create that directory structure and a YAML file with a name of your choice.
Using a macOS based system, while in the root of my local git repo, I did this with the following code:
mkdir -p .github/workflows
touch build-site.yml
Now we need to set up a personal access token. This is used so that GitHub Actions can access our GitHub repositories. The Personal access tokens can be found by going into your GitHub profile’s “Settings” section, clicking on “Developer Settings”, then “Personal access tokens”. Click “Generate new token”. This will ask for a description of the token and what permissions it will need. I used the following permissions:
- repo:status
- repo_deployment
- public_repo
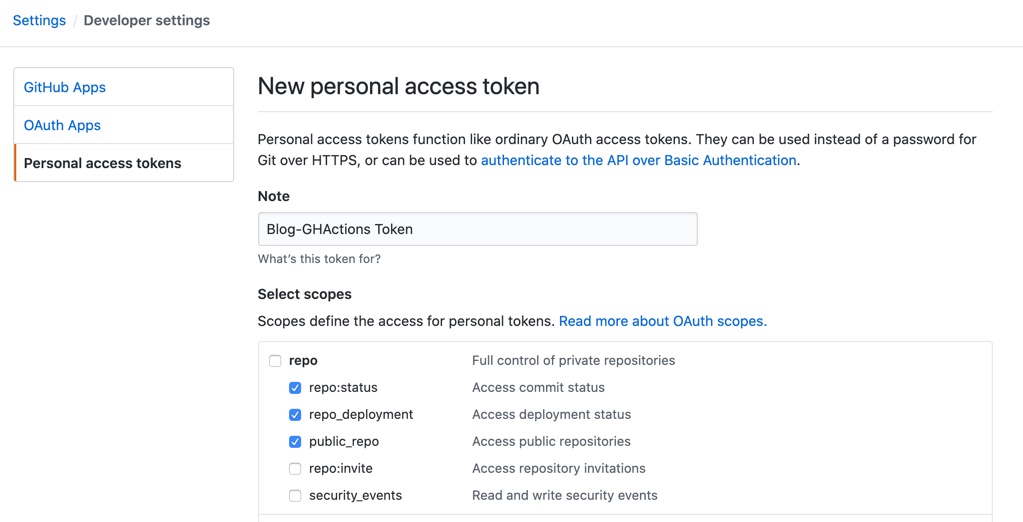
After clicking the green “Generate token” button, it will give you the option to copy the token. This is the only time you can access the token, so copy that and store it in a secure location.
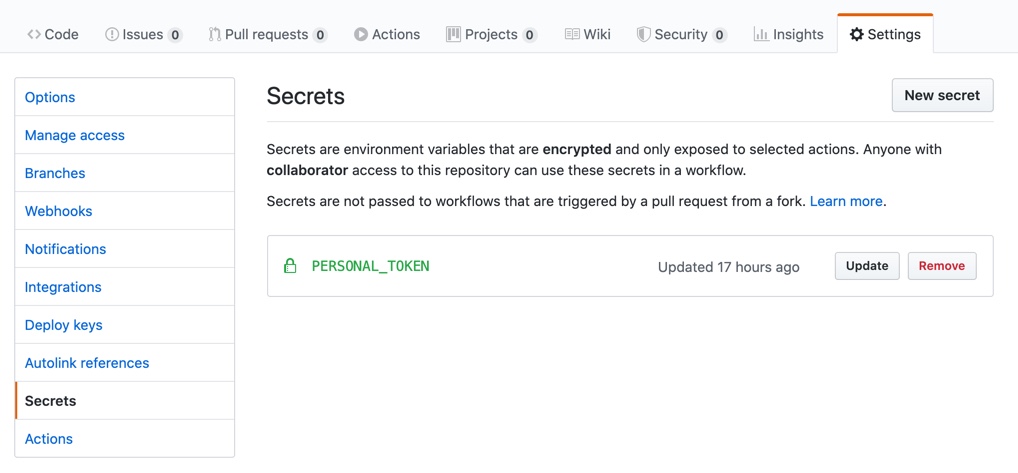
We will now want to add that token as a “Secret” to the repo containing our Hugo configuration. This can be done by browsing to the GitHub repo’s Settings page and selecting “Secrets”. We will then click the “New secret” button. The name should be listed as PERSONAL_TOKEN and the token can be pasted into the “Value” section.
After that, we’re ready to configure the YAML file!
GitHub Actions Configuration
I’ll start by posting my configuration file, then we can walk through the different sections.
name: Build Site

on:
  push:
    branches:
      - master

jobs:
  build-site:
    runs-on: ubuntu-latest

    steps:
      - name: Checkout Repo
        uses: actions/checkout@master
        with:
          submodules: true

      - name: Publish Site
        uses: chabad360/hugo-gh-pages@1.2
        with:
          githubToken: ${{ secrets.PERSONAL_TOKEN }}
          cname: www.kmruddy.com
          repo: kmruddy/kmruddy.github.io
          branch: master
There are a couple of important sections to the configuration file. The Name property will be how the action shows up in the UI. The on block configures the instructions for when the action should run. The current block specifies that it should run on any push to the current repository’s (the one containing the Hugo config) master branch. The jobs block is where the magic happens. The runs-on property specifies the operating system to be used for the runner. Ubuntu is plenty for this operation but, if you’d like to change the runner, information about other runners are available here. The next part of the jobs block are the steps. These are the sequentially run processes that define what the action does. The first step is used to access our current repository within the runner. The next step consolidates the build and push process of our Hugo configuration to our GitHub Pages based repository.
The “Publish Site” step needs some further discussion. What we’re doing here is making use of a published Action from the GitHub Marketplace. The Hugo to GH Pages Action simplifies the requirements of building out our GitHub Pages site thanks to an existing project. We can define a couple of parameters, such as our PERSONAL_TOKEN, the repo where our GitHub Pages site exists (eg. where the output of the Hugo process should be stored), and some additional optional inputs. I’m using a cname and have GitHub Pages pointed at the master branch, so I included those properties in the configuration.
Once we submit these updates to GitHub, we are all set!
Here’s what I saw on my side:
